
|
|
|
|
|
|
|
Chicks & Chick Rearing |
|
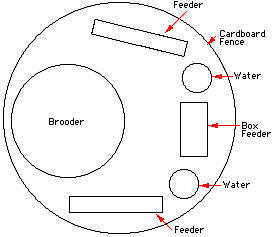
Producers should order sexed pullet chicks when purchasing egg-production strains. Males are not needed in an egg production flock unless fertile eggs are wanted for hatching. The males eat feed and take up space that could be used by hens. There are commercial hatcheries and jobbers in most areas of the state that are able to provide good healthy chicks or pullets of the egg-laying strains. It’s best to delay the sexual maturity of pullets to permit better body growth before they begin egg production. An increase in day length encourages early sexual maturity of the pullet. Chicks hatched between April and August can be exposed to the natural day length because the day length is decreasing during the latter part of the growth period. These birds will respond favourably to increased light stimulation when they are physically ready to come into production. Producers with small flocks should consider starting chicks after March, since less heat will be required to brood them. Economic ConsiderationsYou may be better off buying started pullets. Compare your costs to dealer prices. Figure the costs of raising a started pullet under your conditions. Multiply your chick cost by 1.1 to allow for some mortality and culling. Leghorn pullets will eat from 16 to 18 pounds per bird and heavy breeds will eat from 20 to 22 pounds from hatch to 20 weeks of age. Figure any equipment costs depreciated over a 10-year period and housing costs over a 20-year period if expenses are incurred. Estimate your expenses for litter, heat for brooding, lights, medication, and other miscellaneous production costs. Allow for any payments made for labour to care for the flock. Convert your figure to a per-pullet basis for comparison. Housing and EquipmentHousing requirements for brooding and rearing chicks and pullets can be quite minimal if done in late spring and summer. Almost any small building that meets the floor-space requirements for the desired-size flock can be used. A small number of chicks can even be brooded in a corner of a garage. After the brooding period, pullets can be reared in a fenced range or yard with only a covered shelter for protection from the weather. Brooding, feeding, and watering equipment can be purchased from local feed and farm supply outfits or mail-order houses. Much of the equipment can be home-built. Used equipment may be available locally from farmers who no longer keep poultry. Usually, three sizes of feed hoppers are recommended so that birds, as they are growing, can easily eat without wasting feed. Hanging tube-type feeders that can be adjusted in height as the birds grow are becoming very popular. It is desirable to place a platform under waterers to avoid wet litter. Automatic waterers save labour, even with small flocks. The house and equipment should be thoroughly cleaned and disinfected before starting chicks. If chicks have been in the house previously, remove all the litter and wash the house and equipment with pressurized water. Scrub and scrape all organic matter from building and equipment surfaces. After cleaning, disinfect building and equipment using an approved compound according to the product manufacturer’s directions. Dry and air the building and then place 2 to 4 inches of wood shavings, straw, or other litter material on the floor. Place a cardboard fence around the brooding area to confine the chicks to the heat source for the first week. Figure 1 shows one suggested arrangement of the brooding area.
|
|
|